  The ESSB Audio Forum Where all your Hi-Fi Audio Questions are Answered |
 |
 
  |
The ESSB Audio Forum Where all your Hi-Fi Audio Questions are Answered |
|
|
- Mod Notes -
They're a few other things We would like to say.
Difficulty -
First, these mods aren't all that easy if you've never had any SMD (Surface Mount Device) experience.
You run the risk of lifting circuit traces, overheating components, damaging ESD sensitive devices, and such.
Kenwood epoxies there chip components to the circuit boards with glue.
This makes it that much more difficult to desolder and remove these components without damaging the surrounding items.
It takes time, equipment, and patience to do it correctly.
You will be requires to carefully drill holes thru the PC board to allow the leads to go thru from the other side.
This makes the mods more time consuming and dangerous.
You have to be aware of the circuit traces on the other side of the board before you drill.
OK,
Now a little word about the circuitry and what we are going to accomplish.
TX Monitor Circuitry
TX Monitor Circuit Description:
After much experimenting here at the Voodoo-LABS,
We think this is going to be the best fix for the low TX Monitor Gain,
it's marginal S/N Ratio, and make for much improved Audio Fidelity.
The problem with the TX Monitor circuit is that Kenwood did not design good fidelity into it.
When we opened up the fidelity, thats when the circuit flaws showed themselves.
The main flaw of which was excessive gain in the op amp circuit, which caused it to operate in saturation.
We had to increase the value of the Monitor Input Resistor (R64) on the AF Unit from
3.3k to 27K ohm to reduce the input gain.
We also reduced the Feedback Resistor (R69) of Op Amp IC8 from 330K to 220K.
This in turn made the Monitor Volume very low.
It was really a non-issue for us as we use a Headphone amplifier for the cans.
But after many complaints of this, we decided to look into it.
On the first attempt, we just decided to change R64 back to a lower value.
This didn´t work very well, as the S/N Ratio came way up with tons of background HISS and the Op Amp was in saturation.
This means the audio always sounded like it was compressed and all the dynamics were gone.
This was no good. Sounded like crap.
What this circuit really needed was another stage of amplification for the monitor.
Kenwood was relying on this one Op Amp to do everything.
So if we added another amplification stage before the Monitor Volume Control then this would drive the
original Op Amp and would keep the Op Amp Gain low and out of saturation.
After looking at IC8 on the AF Unit, it was noticed that Kenwood was only using half of it.
There was an unused amplifier stage just sitting there, IC8 (1/2).
We prevoosly shorted the input pins together on theis op amps stage as Kenwood forgot to do this in design.
You will notice that pins 2,3 & 4 in the pictures were shorted together.
This keeps the crosstalk & hum down in the other side if the chip.
We un-shorted the pins, and decided to use this for our preamplifier.
We decided to place the new Pre Amp before the Monitor Volume Control, and after the TX Monitor Audio Switch IC10.
This would always give us a good output impedance and gain available for the next stage.
To do this required us to drill some more holes in the AF Unit.
The placement of these holes was critical to keep the leads as short as possible.
They wound up being next to CN12 of the AF Unit and very close to IC8.
We also restructured the gain around IC8 (2/2). We change R69 to a 220K Ohm resistor.
This drops the gain from 33 to 22 for the Main receiver & from 100 to 66 on the Monitor before R64 is changed to a 27K.
Changing R64 to a 27K Ohm resistor brings the gain of the Monitor down to 8.14.
This will be acceptable with a preamp driving it.
After the initial Monitor Improvement Mods were completed, it was noticed that there was a .5-second delay before the
Monitor Audio was heard in the headphones when the rig was first keyed to TX.
There was also some ‘Popping’ heard for the first few TX keying cycles.
The problem was that the 10uf input capacitor was having to charge itself upon the
first TX keying cycle as there was no path to ground for it.
This was the cause of the .5-second delay.
Upon subsequent TX Keying cycles, the cap still had to stabilize the voltage thru IC10, which caused the popping sound.
The Solution was to add a 100K resistor to ground on the negative side of the 10uf Input Capacitor.
This gave a path to ground so the capacitor could charge up and stay charged.
Here is the schematic of the Pre-amp stage we designed:

Gotta have PARTS!!!
Monitor Improvement Mod Parts |
||
Part Nominclature: |
DigiKey - Part Numbers - Manufacturer |
|
| C42 - 1uF changed to 4.7uF Electrolytic |
P10315-ND ---- EEU-FC1H4R7 |
|
| C43 - 47uF changed to 100uF Electrolytic |
P10269-ND ---- EEU-FC1E101S |
|
| C23 - 47uF changed to 100uF Electrolytic |
P10269-ND ---- EEU-FC1E101S |
|
| C45 - 4.7uF changed to 47uF Electrolytic |
P10321-ND ---- EEU-FC1H470 |
|
| 10uF - You will need 2ea of these Electrolytic |
P10316-ND ---- EEU-FC1H100L |
|
| 100pF - You will need 1ea of these 805 SMD Chip Capacitor |
PCC101CGCT-ND ---- ECJ-2VC1H101J |
|
| R69 - 330K ohm change to 220K ohm 805 SMD Chip |
P220KACT-ND ---- ERJ-6GEYJ224V |
|
| R64 - 3.3K ohm changed to 27K ohm 805 SMD Chip |
RR12P27.0KDCT-ND ---- RR1220P-273-D |
|
| 100K ohm - You will need 2ea of these 805 SMD Chip |
RHM100KCRCT-ND ---- MCR10EZPF1003 |
|
| 15K ohm - You will need 1ea of these 1/6 watt axial |
15KEBK-ND ---- CFR-12JB-15K |
|
| IF Unit |
||
| C27 - 4.7uF changed to 10uF Electrolytic |
P10316-ND ---- EEU-FC1H100L |
|
Lets MODIFY!!
Before we get too far ahead of ourselves lets start from the beginning.
First you need to locate where you will be working.
Then remove the capacitors in that area to give you some room to work.
You also need to check C42 at this time to see if it was already changed to a 4.7uF when you did the mods last.
If its not a 4.7uF, it needs to be removed and changed as well.

Here is a Pic of the AF Unit. The Op Amp we will be working on is IC8.

Here are C43, C45, C41 and C135 Electrolytic Caps removed for working room.
If C42 is not already a 4.7uF value, remove it also.

This is were we decided to drill the Holes for the Input and Output of the new Preamplifier Stage.

This is a closer view of were we drilled the holes.

Here's a pic showing the other side of the AF board were the holes come thru.

The next step is building the Feedback Gain and Low pass filter onto the Chip pins itself.
You will solder a SMD 100K Ohm resistor across Pins 1 & 2 of IC8.
You want to kind of offset it towards pin 1 as the power jumper has to connect to Pin 3 later.
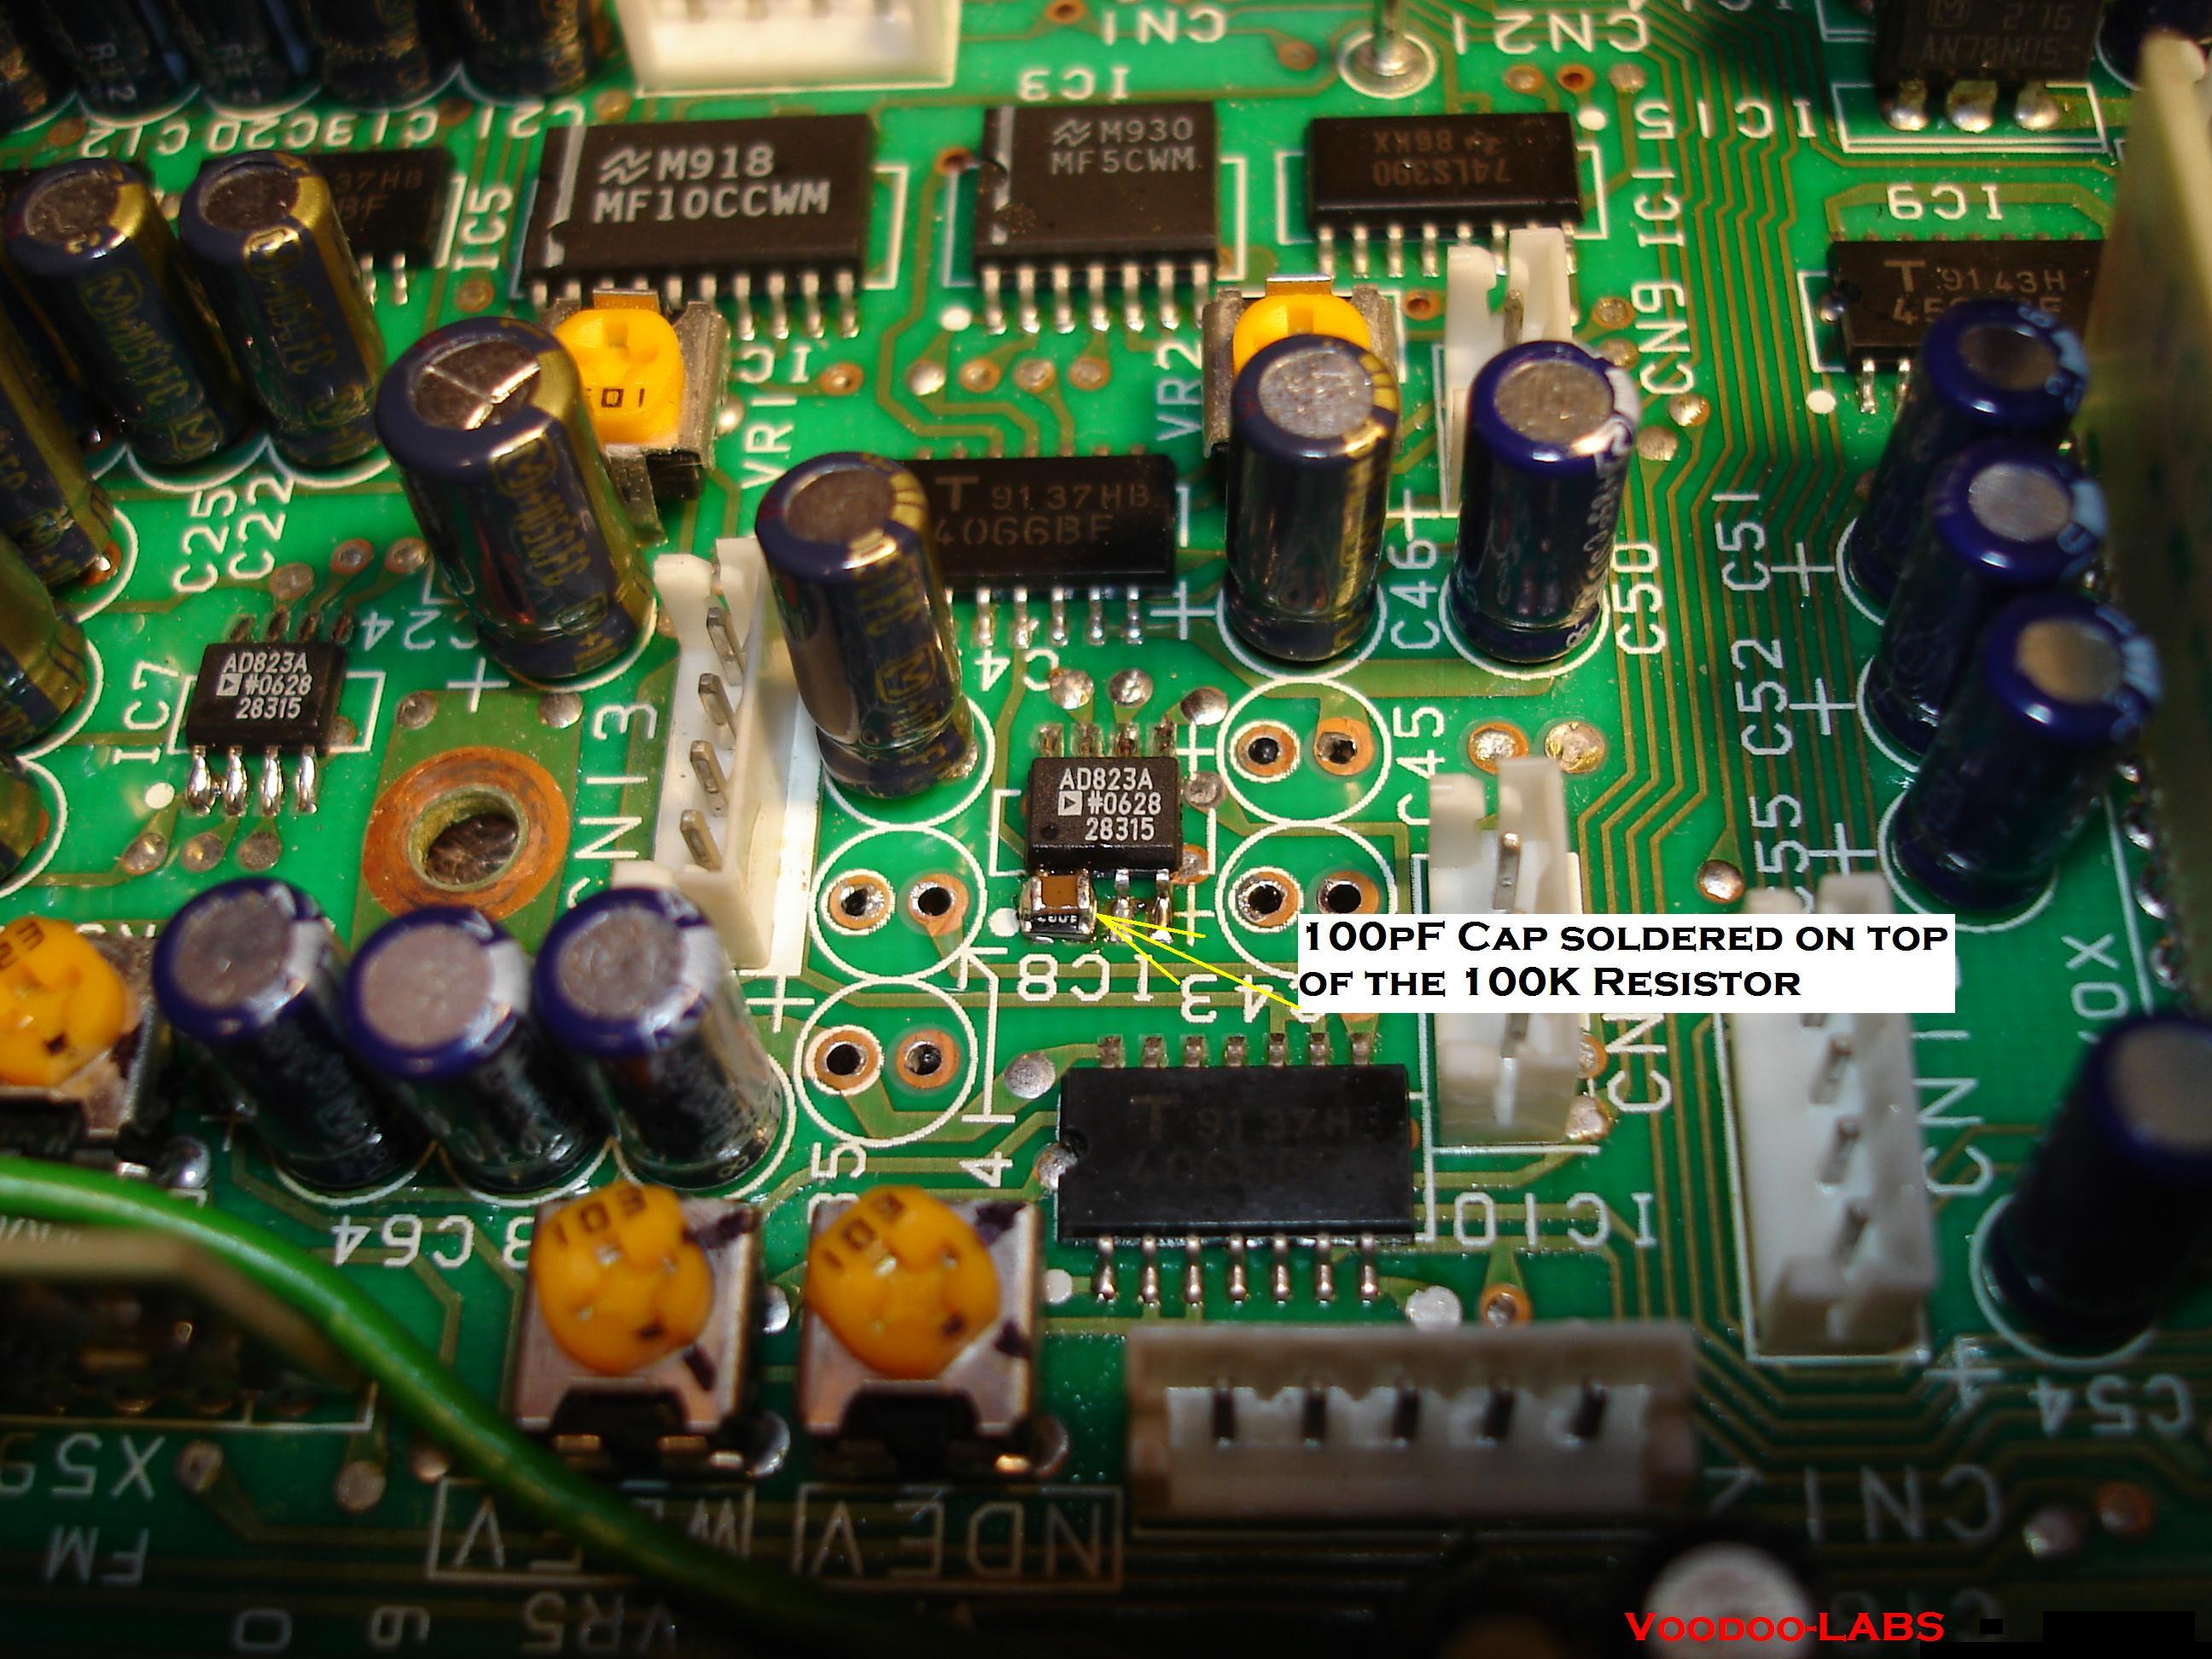
Next comes the SMD 100pF Low Pass Capacitor. It is soldered on top of the Resistor.

Next is the Power Pickoff point for the Pin 3 of IC8.

Now install a short jumper from the solder pad to Pin 3 of IC8.
Ignore the SMD Resistor that is showing on top of Pin 2, it was a bad design I scrapped later.

The next thing is to make the Input Capacitor and Resistor Combo. USE HEATSHRINK everywhere!!
This is a 10uF electrolytic with the + lead to the 15K Ohm Resistor.
Then install it along with the Output Capacitor. I put some pictures of it here,
but you might have to look at a few of them to get the gist of how its laid out.

The pictures are tricky. Where the caps leads go to the CN12, they actually cross over each other.
Be careful and pay attention to the schematic and the pictures, there right.


Hopefully you got it!! Hahahaha

Ok, Next is how it will look on the bottom of the board near CN12.

The Trace is scraped to prepare for the 100K resistor installation.

The 100k chip resistor is installed.

Another view of the installed 100K chip resistor.
OK, the hard parts over, now we will re-install the removed electrolytic caps.
But we will be changing some of the values.
Change C42 from 1uF to 4.7uF. (This one may already be a 4.7uF)
Change C43 from 47uF to 100uF.
Change C45 from 4.7uF to 47uF.
You will also need to change C23 electrolytic from a 47uF to a 100uF.
Now there are a few SMD parts that need to be changed.
If you followed my mods on the Website,
R64 on the AF board is already a 27K Ohm chip resistor and should not have to be changed.
Just check it to be sure.
You will need to change R69 from a 330K ohm to a 220K-ohm resistor.

Check that R64 is a 27K resistor, If not change it.
You will need to change R69 from a 330K resitor to a 220K.

This is what it looks like when its all finished.

Here's another angle with all the caps installed.

One more view of the finished product.
One more thing...
you will need to change the C27 Electrolytic cap on the IF Unit.
This needs to be changed from 4.7uF to a 10uF.
This must be done to allow the lows thru to the AF Unit.
Take Care!!
Click here to Return to the Top of this Page.
Click here to Return to the TS-950SDX Voodoo Mods Page.
Click here to Return to the Home Page.
"Voodoo-LABS TS-950sdx TX Monitor Improvement Mod" page designed by the VOODOO GURU