  The ESSB Audio Forum Where all your Hi-Fi Audio Questions are Answered |
 |
 
  |
The ESSB Audio Forum Where all your Hi-Fi Audio Questions are Answered |
|
|
There Hear!!!
We know that Ya'll have been hearing about these mods for some time now,
even been readin about 'em on the ESSB Audio Forum.
Well, We finally took some time out here at the Voodoo-Labs
and compiled it all into one place.
This is where you'll find all that sweet info.
Now you got to take some time out
to read these brilliant words of wisdom...
Alrighty then....
The mods on the Bellari are pretty easy to do.
They use sockets for their Op Amps, so they can be changed very easily.
No Soldering in other words...Yea!
The Tubes just 'Plug' In, of course.
Now there is something that must be told to you,
there is a certain amount of 'Burn In' time required to
get the full Sonic Impact from these mods.
It takes about 50 hours (at least!) to burn in a Tube and the Op Amps.
This is WITH a signal going thru them...not just sitting there idle.
So keep this in mind, you will here the Sonic changes as
they happen over that period of time...It's soooo Kewl!!
OK Ya'll, Here we go!
As was said before, the mods for the Bellari's are not hard.
So basically I'm just going to show you a bunch of pictures
and tell you some info about the different units.
These mods won't be as involved or elaborate as
the others we have posted on this site.
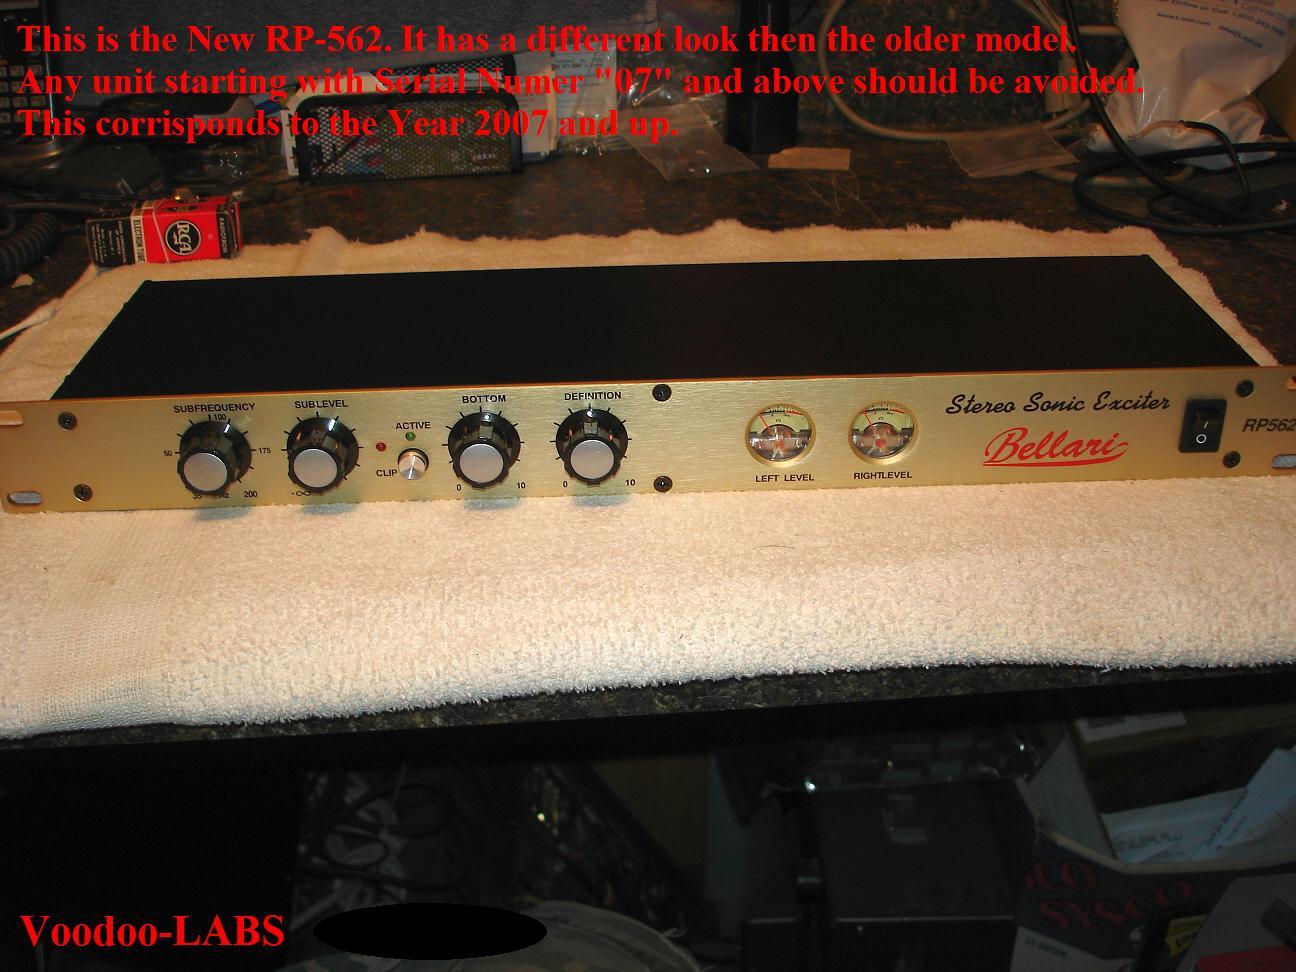
UPDATE 8-20-09!!
Bellari Redesigned the RP-562 in 2007.
It has a slightly different look then the older models.
Unfortunately, they ruined the circuit design.
They substituted the Linear Transformer based Tube High Voltage Power Supply
with a Switching Inverter type.
This is radiating RF noise into every circuit in the Unit, especially INTO the tubes!
Voodoo-LABS had to install Shielding in between the Inverter and
the Right Channel Tube as it was picking up substantial noise.
The Positive 12V Power Rail is also picking up noise,
Sadly, no amount of bypassing could remove all of it.
Serial Numbers to avoid are anything starting with "07" and above.
The "07" corresponds to the year 2007.
Tubage Rolling
Well, guess we need to describe what we're going to be doing here.
Most all the Bellari come with 5751 Philips JAN tubes now.
The early models were sometimes fitted with 12AX7 or 7025 tubes.
The 12ax7 and the 7025 were pretty high gain tubes compared to the 5751.
This leads to microphonics and a susceptibility to 60cps hum and oscillations.
The 5751 has about 30% less gain and is usually built more rugged which makes it less prone to microphonics.
This was because it was originally made for the military for use in their equipment.
The 5751 also has very different Sonic Characteristics then the 7025 or 12AX7.
Even more important, is that the different Brands of 5751's have totally different Sonic Characteristics from each other.
We won't get into all the whys and wherefores here, but you can look it up on the web and research the different tubes.
A good site to start at is Joe's Tube Lore by Nick Dangerous.
After many, many hours of Tube Rolling here at Voodoo-Labs,
the absolute BEST tube we found for Low Frequency Resonance and Harmonix was the RCA 5751 Command Series Black Plate.
This is the Tubage we chose to Roll into ALL our Bellari's.
Greg, W5UDX says that the GE JAN 5751 Gray Plate is a good substitute for the RCA Commands...and cheaper.
We tried them here at Voodoo Labs and think they are a good alternative only if you can't find the RCA Commands.
They just don't have the Voodoo like the Commands do!
The following are some real bad Pics of the different units, but the procedure is rather straightforward.
Unplug the unit. Take out the screws in the top cover of the units, pull out the old tubes,
put in the new tubage, put the cover back on, Bam...your done.

Here is an inside pic of the RP-533. The Tubes are right there in the open.
You can also see the 3ea Op Amps in there sockets. Also notice the 5ea Gold Plated Sealed Switches that were replaced.

This is the RP-562. Notice the tubes are horizontal in this unit.
You must be careful and support the vertical PC board when removing and installing the tubes.
MAKE SURE THE UNIT IS UNPLUGED!!
UPDATE 8-20-09!!
Bellari Redesigned the RP-562 in 2007. It has a slightly different look then the older models.
Unfortunately, they ruined the circuit design.
They substituted the Linear Transformer based Tube High Voltage Power Supply with a Switching Inverter type.
This is radiating RF noise into every circuit in the Unit, especially INTO the tubes!
Voodoo-LABS had to install Shielding in between the Inverter and the Right Channel Tube as it was picking up substantial noise.
The Positive 12V Power Rail is also picking up noise, no amount of bypassing could remove all of it.
Serial Numbers to avoid are anything starting with "07" and above. "07" corresponds to the year 2007.

UPDATE 8-20-09!!
Here is an inside view of the re-designed RP-562.
You can see the difference in the High Voltage Supply Circuitry compared to the pic above.
We had to install shielding between the switching supply components and the right channel tube.
This made the right channel usable. It was picking up substantial RF noise form the Inverter.
The Positive 12V Power Rail is also picking up noise, sadly no amount of bypassing could remove all of it.
Serial Numbers to avoid are anything starting with "07" and above. "07" corresponds to the year 2007.

Here's the RP-520. It's just like the RP-583 and the RP-533.
Just pull out the old ones and put in the new ones.
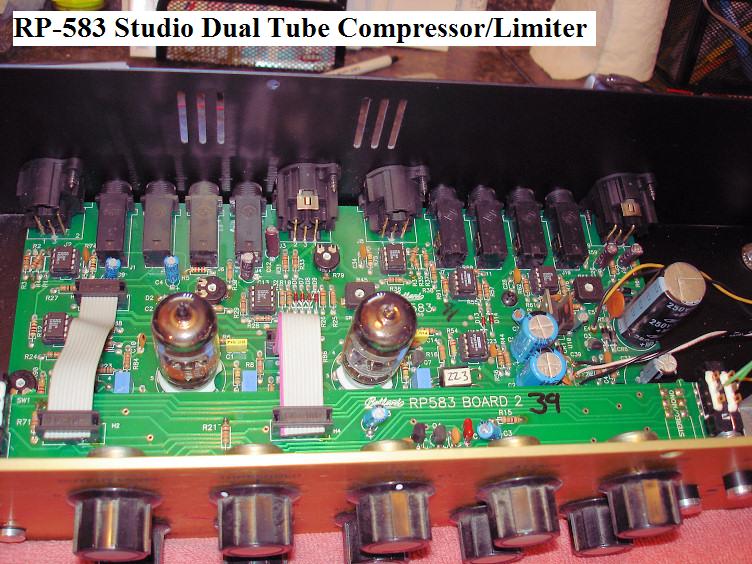
Here's the RP-583. It's just like the RP-520 and the RP-533.
Just pull out the old ones and put in the new ones.
Op Amp Rolling
As with the Tubes, Voodoo Labs has spent hours and hours rolling out Op Amps.
Why? you might ask...there solid state devices.
Well they all have different Sonic Characteristics just like different Tubes do.
Some seem to contest this, alls we can say is 'ARE YOU DEAF?!'
We were looking for the best sounding device and went thru allot of them until we finally found the Holy Grail!
It's the AD823AN made by Analog Devices. The AN designates the case as a 8pin DIP.
An alternate P/N is the AD823ANZ, it's the same part as the "Z" is just a designator for "Lead Free" manufacturing.
This little beauty is just awesome!
It has more Resolution, more Definition, more Dynamic Range, more Clarity,
more Frequency Separation, and most importantly.....it just plain Sounds BETTER!!!
Now for the mod...
OK, this gets a little more complecated....but not very much!
The hardest part with these is getting the old Op Amps out without bending the pins all up.
Be sure you mark where pin #1 is on the socket before removing the old Op Amp!
Best way is to take some needle nose pliers and GENTLY rock the original Op Amp back and forth while pullin up.
It doesn't take much.Now the new Op Amp pins will be a little wider then the sockets.
You will need to squish the pins in slightly to make them line up with the socket holes.
Best to observe ESD static procedures here. They can be damaged by static electricity.
Also be sure to orient the new Op Amp with it's #1 pin to the #1 pin on the socket! You will destroy it otherwise.
The #1 Pin usually has a dot by it.
The RP-520, RP-562, and RP-533 all take 3ea Op Amps apiece. The RP-583 takes 6ea.
But wait a minute you say; there are 7 Op Amps in the RP583!?
Glad you noticed that!!
Well, there ARE 7ea Op Amps in there, but we're only going to change out 6 of them.
U13 will not be changed out, it must remain as the BA4560.
DO NOT change U13!!
There is a background distortion and popping that is sent out along the Ground and the Power Rails if anything else is used at U13.
We've tried bypassing the chip with every conceivable configuration of capacitor arrangement.
No matter what we did, it always got worse, so bad in fact that the BA4560 wouldn't even work anymore.
It looks like Bellari designed that section, for that chip...period.
So whats the Solution?
Leave the original chip in the U13 socket. It will not hurt a thing to leave the BA4560 where it is.
This chip is not in the Audio Path so you will not notice a bit of difference in the final Audio Sonics.
All it does is amplify the Audio to almost clipping and feeds it to the Compressor circuitry.
Now that they are all changed (except for U13), You need to let them burn in for
at least 50 hours with a signal going thru them before making any judgments.
One other thing, after the 50 hour burn in, you may notice that the Gain Reduction meter is now OFF of the Zero Mark.
This is normal and can be adjusted back with no problems. Just let them settle in first.
The Circuit Board is usually marked (GR 0 CAL) as to what Variable Resistor to tweak on for Gain Reduction Zero.
The only other problem that might occur is sometimes the circuit paths need to be checked with
an oscilloscope to make sure the op amps are not oscillating.
If they are, then the power supply rails need to have some bypass caps installed.
We have NOT had a single instance that this has happened with the AD823,
but we did have it happen with the Burr Brown OP2604, and the OP2134.
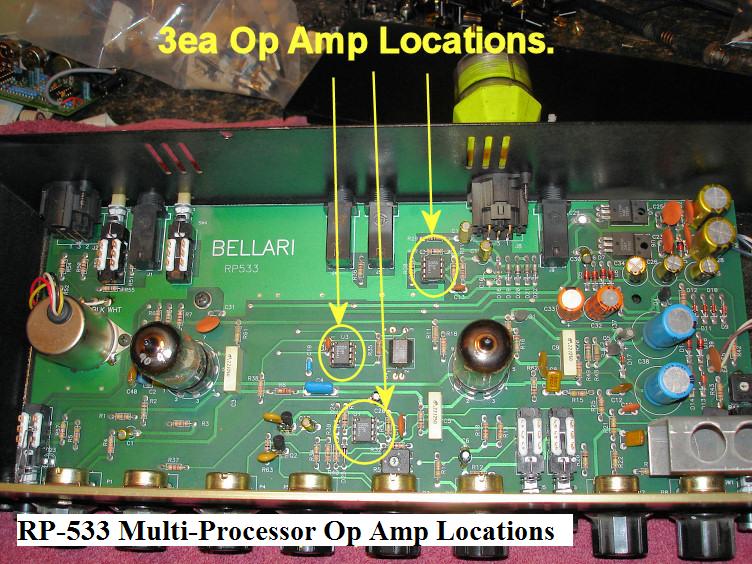
Here is an inside pic of the RP-533. The Op Amps are marked in yellow.
Be sure to orient the #1 Pin of the Op Amp to the correct pin on the socket.

Here's the RP-562. The Op Amp locations are in yellow.

This is the Op Amp locations for the RP-520. Their marked in yellow.
Notice that the Switches haven't been changed out yet. This is a very old Pic
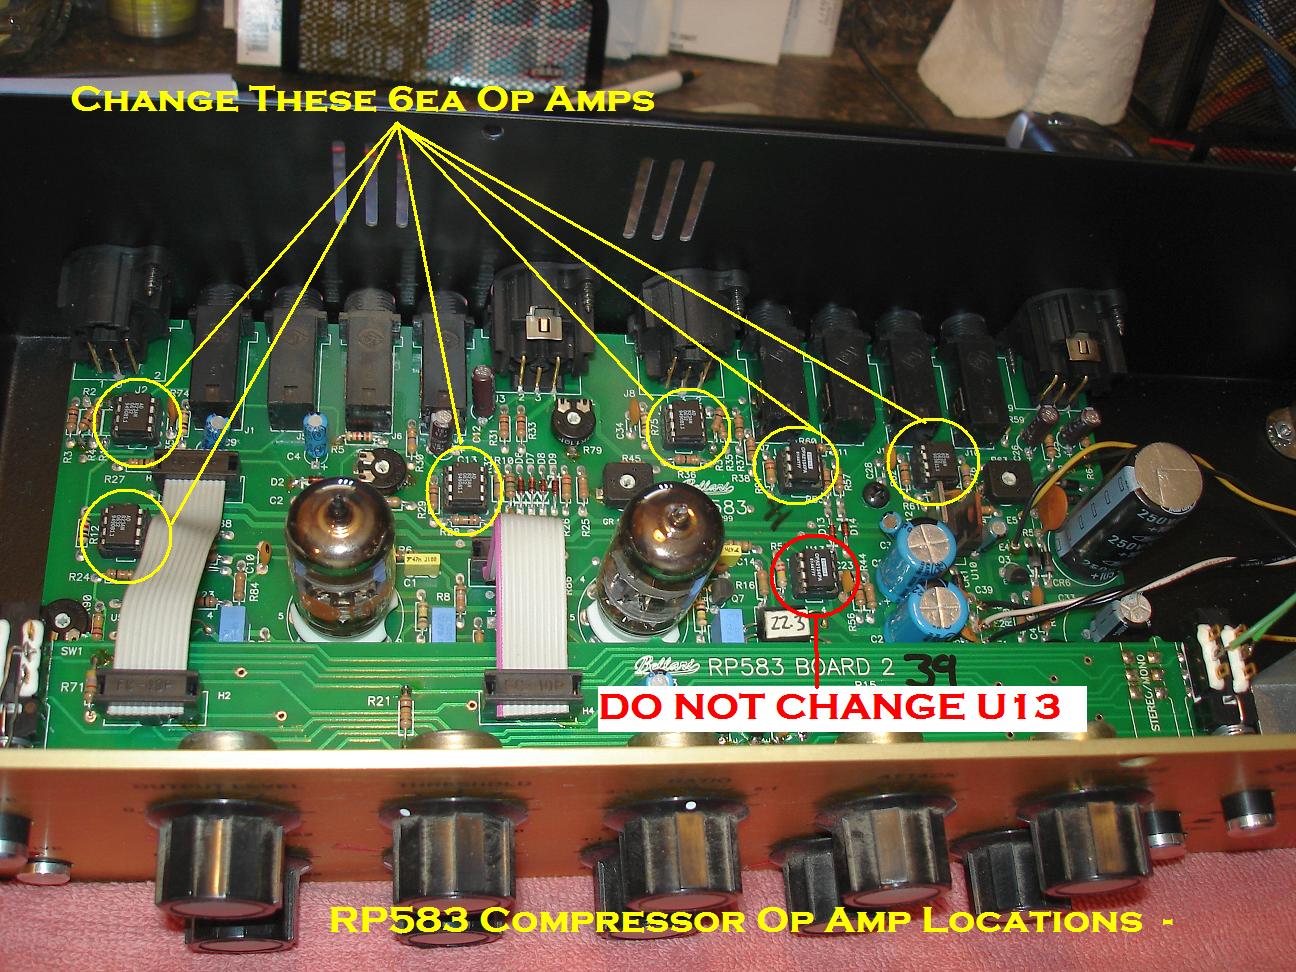
These are the 6ea Op Amp locations for the RP-583. Their marked in yellow.
Notice the location of U13, DO NOT change this Op Amp!
Gold Plated, Sealed Switches
As awesome the Bellari sound is, this line does have a design flaw.
It's those awful switches that come in it from the factory.....uhhhhhhh!!!!!
They decided to use tin plated, open switches in these fine units.
After a few years, oxide starts to form on the internal contacts, and you get this awful scratchy noise.
It's just plain horrible and only gets worse and worse once it starts. You can't clean em either.
Why Bellari decided to put these horrid switches in the Audio path, who knows?
After an exhaustive search was performed by the personnel at Voodoo Labs, a direct replacement was finally found for it.
Its a Sealed Switch that has Gold Plated Contacts...and it wasn't cheap!
There's only one Manufacturer that makes it, and one Distributor that even stocks and sells it now.
The mod is a little more difficult then the last one, and soldering is required.
The entire unit must be disassembled and the main circuit board removed.
Then its just a matter of removing the old switches and replacing them with the new ones.
The P/N is F2UEE-TB-AU and there made by ITT - Cannon.
The only place that has them available is Onlinecomponents.com under the ITT manufacturers P/N 120259.
The RP-562 uses a different P/N for the Gold Plated Replacement but it is not Sealed.
The P/N is F4UEE-AU and can be gotten from Digikey as 401-1227-ND.
Have Fun!!
You can see the 5ea switches that were changed in the RP533.
They were also 5ea Switches changed in this RP583.
You can't see em real good, but there all on the front.
The RP-533 'Verooooong' Mod
Depending on if your Bellari RP-533 is a later version or an early version,
there are some power supply mods that need to be done to it as well.
We call it the 'Verooooong' Mod.
The early version models of the RP533 can be identified by the "RELEASE" control markings.
They are 100 to 500 MS (milliseconds).
The later version models have the markings .1 to 2 S (seconds).
So far, only the early models have had the badly designed High Voltage Regulator Circuit in it for the Tubes Plate Voltage.
When you would turn the unit on, or if there was a voltage sag (like an A/C compressor engaging),
there would be a loud 'Verooooong' sound in the mix.
We modded these units with the same power supply regulator circuit that Bellari was using in there RP583 Compressor units.
Bellari also started to do this mod in the newer 533 units.
The mod is pretty easy.
Just take the parts from the RP583 Schematic and replace them in the RP533.
In other words, make the RP533 schematic look like the RP583.
|
'Veroooooong' Mod Parts
|
||
Parts |
Part Numbers |
|
| 1ea - 100uF @ 250v Electrolytic | Digikey - P5938-ND ---- EEU-EB2V101 |
|
| 1ea - 10uF @ 350v Electrolytic | Digikey - P5931-ND ---- EEU-EB2V100 |
|
| 1ea - .001uF @ 250v Poly Cap | Digikey - 495-1174-ND ---- B32529C3102J |
|
| 1ea - 330K ohm Resistor | Digikey - P330KCACT-ND ---- ERO-S2PHF3303 |
|
| 1ea - MPSA42 Transistor | Digikey - MPSA42RLRA05CT-ND ---- MPSA42RLRA |
|
| 1ea - 22uF @ 250v Electrolytic | Digikey - P5922-ND ---- EEU-EB2E220 |
|

This is the Early Version High Voltage Supply Schematic for the RP533.
The components are changed with the ones from the RP-583.

Here's the RP-583 High Voltage Supply Schematic.
This is the one used for the modification of the RP-533.
That's It!
Well, There Ya'll go.
You won't believe the difference in the audio from these simple mods.
It's well worth the time and expense. You won't be disappointed.
Ya'll Take Care Now, Ya Hear!!
Click here to Return to the Top of this Page.
Click here to Return to the Gearslutz Voodoo Audio Mods Page.
Click here to Return to the Home Page.
"Bellari Audio Modifications" page designed by the VOODOO GURU